Welcome to my article on how to build an email list with mailerlite. First of all, congratulations on taking the first step to building an email list.
Quick question for you! Have you ever subscribed to my newsletter? If you have, then you’ve been a customer of someone else’s email marketing effort.
In this article, I’d like to not only go over the importance of email marketing but also how you can leverage email marketing to generate more income for your online business.
The Importance of Email Marketing

Email marketing is essential for an online business that is looking to prosper. You are essentially leaving hundreds or even thousands of dollars on the table by neglecting email marketing. Allow me to explain:
When you send traffic directly to the affiliate partner, that will only earn you a potential one-time sale. Whereas, if you collect their emails, you can continue to market to these people over and over again.
Obviously, they can unsubscribe, but that’s why it’s important for you to not spam their emails.
For example, You create an opt-in form for your subscribers to get updates on the latest vaporizer devices. Once they’ve made a purchase, you can continue to email them on occasions to keep them updated when a newer device gets released.
In this tutorial, you will learn how to start your very own step-by-step! Before we begin, let’s go over what is necessary in order to have a successful email list. Without further ado, let’s get right to it!
Must-Have The Following Before You Start Collecting Emails
#1. A Niche Website: Normally, I would recommend starting an email list when you have a decent amount of traffic. Building an email list is usually not free because you have to pay for an email marketing service. That’s why most internet marketers opt-out of this option until they have regular traffic.
MailerLite is one of those email marketing services that offer forever free with no limitation service as long as you have less than 1000 subscribers.
It’s a great way to get started without having to spend a fortune. Obviously, once you’ve grown past the 1000 subscriber mark, you will have to start spending money.— With a good number of targeted subscribers, you can easily make your money back plus more.
#2. An opt-in or sign up form to collect emails: This one is pretty obvious because you need a way to collect emails. You must give your readers a reason to subscribe to your newsletter.
It can be in the form of a free eBook or promise to provide helpful information in the future.— This is similar to asking for subscribers on YouTube.
#3. Regularly check your email for questions and comments: The whole point of email marketing is to gain communication access with your subscribers.
They don’t want to feel like you don’t care once they’ve subscribed. Don’t forget, they have the power to unsubscribe.
If your subscribers have any questions or comments, make sure you are readily available. — I recommend letting your subscribers know that response time can take up to 24 hours.
Methods To Collect Email
When it comes to email marketing, there are many ways to collect emails. Allow me to go over a few that I know. Keep in mind, some of these features are not available to every email marketing service.
In Content Opt-in: You can place an opt-in or sign up from within your content. When your visitors scroll through your articles, they will find a form conveniently placed within the article for easy sign-up.
Lightbox with Exit Intent: A type of popup that blurs out the entire background. Pop-ups are annoying, but it’s okay if you incorporate this with exit intent.— They were planning to exit your website anyways right?
Ribbon: This is an opt-in or sign up method in the form of a bar. It is usually placed on your header and follows the user as they scroll up or down.
Post Footer: This is placed at the very end of each article allowing them to read without distraction. If your readers actually finish reading your article then they are more likely to subscribe anyway.
Screen Filler: This is an opt-in or sign up form that completely fills up the entire screen. I’m not a huge fan of this, but definitely effective in getting your visitor’s attention.— That’s like someone coming up to you and placing a paper saying sign up now in your face.
Landing Pages: This is a dedicated page designed to collect emails. A lot of people use pay-per-click advertising such as Google AdWords to sends traffic directly to these landing pages to collect emails fast.
Now that you’ve learned about email marketing, let’s get started on making one for yourself!
How To Build An Email List Using Mailerlite Today (Step by Step)
Signing up for an email marketing service:
MailerLite offers forever free membership for those who have less than 1000 subscribers. This is perfect for people like you who are looking to start out.

You will have to complete their 2-step process to validate your account once you’ve completed the registration.
The validation process consists of the following:
- Completion of your profile
- Verifying your website domain
I’m going to go into detail to explain how to verify your website domain. Since you should have a website by now, you should also have an email address associated with your domain.
For example, my email address associated with my domain is: eric@smartaffiliatehub.com
You will have to enter your email address associated with your domain. Once you’ve done that, you will be asked to click on the verification link sent to that email address.

Viola! Like magic, the 2-step process is completed. You will now have to wait up to 24 hours; usually 15 minutes to get the approval email.
The following steps are written to work with MailerLite, but the concept is the same as other services when it comes to email marketing. I will also include pictures from MailerLite to guide you along the way.
Optional Step:
Do you have an email list already? You can upload your own list directly into MailerLite by clicking Subscribers > Add Subscribers > Import from a CSV or TXT file.
Step #1: Creating Your First Campaign

A campaign is basically an email or newsletter that you will be sent to your subscribers later.
There are 4 types of campaigns for you to choose from:
- A regular Campaign is basically a normal campaign.
- An A/B Split Campaign allows you to test various campaigns to see which one performs better. This allows you to strategically work on email marketing to generate the best results.
- The Auto Resend option allows you to automatically resend campaigns to subscribers who did not previously open the email or click on provided links.
- RSS campaigns allow you to automatically send emails to your subscribers every time a new article/blog gets published on your website. You can use this feature to set a schedule, so you’re not sending out too many emails per day to your subscribers.
The rest is relatively simple, you will have to completely fill in the subject and verify that the sender’s email is the same as your domain email address.
Once you’re done here, all you have to is click “NEXT”.

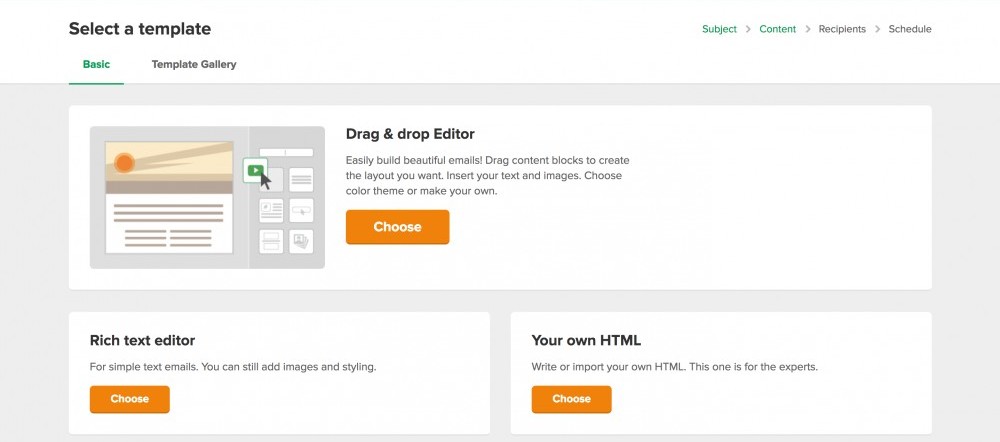
MailerLite offers you 3 ways to design your emails. Personally, I prefer the Drag & Drop editor and using one of their templates and just changing to the text within. Once you’ve finished editing the email, you can select your recipients. This is very useful if you have different groups of subscribers.
Tip: Click “Send Test Email” every time to ensure it works!— You can also have it sent right away or set a schedule of when you want MailerLite to deliver the email.
Step #2: Automation (MUST USE)
You can somewhat skip the campaign at first, but automation is a must! Basically, with automation, you can send a series of emails such as the welcome message as well as follow up.
There are 4 key steps based on time, condition, or action. This will allow you to sleep easily without worrying about manually sending emails to all of your subscribers.
Let me go over them with you!
- Email: Create a new one or select a previous campaign email that you want to send out automatically.
- Delay: Set a delay timer (minutes, hours, weekly, monthly, etc). This allows you to dictate when the emails get dispatched.
- Condition: Email was opened, but a specific link was not clicked. For example, you’re promoting baby clothes for both boys and girls. If they click the link for the girl clothes, the future emails they receive will only be able girl clothes.
- Action: This is where your subscribers have the option to change groups, unsubscribe, etc.
Click here for a picture of the automation process. (I decided not to add it as a picture here because it’s too big)
Step #3: Set Up Sign Up Forms
Okay, we have our email autoresponder completely set up. Now it’s time for you to create a sign-up form for your website.
MailerLite provides you with the option to create your own forms which can be added to your website or blog to collect emails. In addition, you also have the option to create landing pages and popups to capture more leads.

For starters, we will focus on Embedded Forms. All you have to do is click on Embedded Forms > Create Embedded Forms > Write a Form Name > Save and Continue.
You now have the option to select an actual form or a button. My recommendation is to focus on the entire form first.

Once you’ve selected the “Create Embed Form” you will be asked to select the subscribers group. — Remember, select the list of people that you want to target.
Next, you will be on the page where you can select single or double opt-in:
- Single Opt-In: No confirmation required. Subscribed immediately.
- Double Opt-In: Requires additional confirmation from your subscriber to become fully subscribed.

Finished customizing your opt-in form? Good, click save and let’s move forward!
Step #4: Embed Form Into Your Website

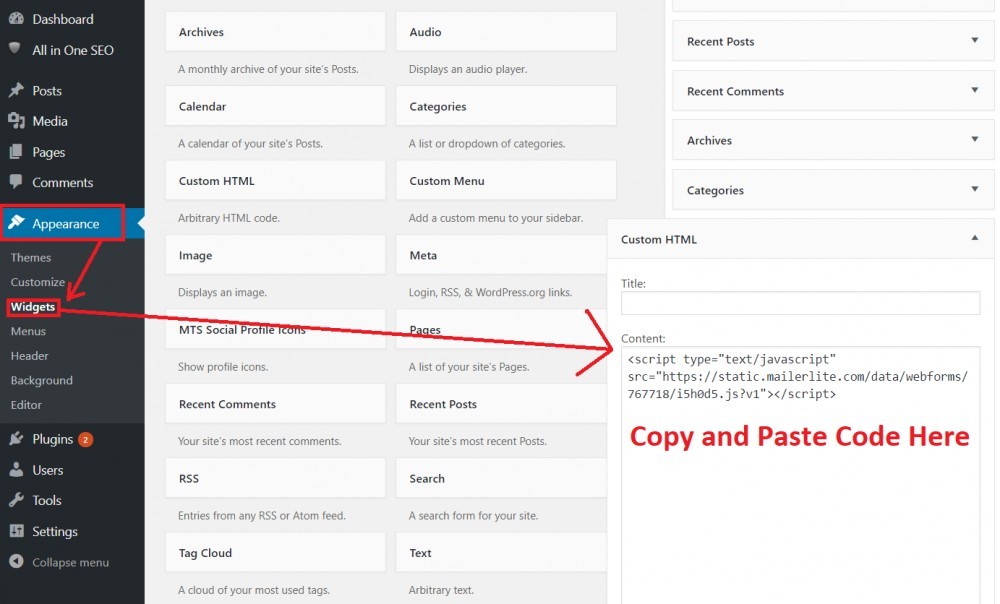
As you can see, there are multiple ways for you to embed the form on your website. I’ll show you an easy way to add your form to your website without the need for downloading additional plugins.
Add Form To Side Widget (Copy the Java or HTML code provided):

Confused? Check out my tutorial on how to add affiliate links to your website.
The form should now appear on your website sidebar! There are other ways to add the form to your website, but adding it to your sidebar is a great start!
Congratulations On Setting Up Your Email Marketing
Now that you have your form and email marketing all set up, the rest is up to you. Soon you will start seeing people subscribing to your website. It is now your job to inform them of helpful and future content.
Just keep this in mind! They subscribed for good information, not spam. They have the power to unsubscribe at any time. Keep your subscribers happy and you will be able to regularly offer them recommendations to products or services.
Enjoyed this article? I understand it’s quite long, but it’s because there’s a lot of steps involved. Inform your peers by sharing this article on your social media if they are looking to grow their online business with email marketing.
If you have any questions, please kindly leave a comment on the comment section below.


 Protected by Patchstack