Google Search Console is a free tool provided by Google to help website owners understand how Google (the top dog in the search engine industry) sees your website(s). However, having the tools is not the same as understanding how to use the tool.
It’s like giving a gun to an ape, without the knowledge of how to properly use the gun. It is nothing, but a metal piece. The way I see it after speaking with a few other internet marketers and business owners.
Most people don’t know how to effectively use Google Search Console to increase their traffic. So in this article, I will focus on showing you how to properly use Google Search Console to improve your overall website performance in terms of generating visitors, leads, and potential customers.
So What Is Google Search Console?
Again, Google Search Console is a free tool provided by Google to help website owners like yourself, monitor and maintain your website’s presence in Google’s SERP (Search Engine Results Page).
It’s absolutely crucial that you use Google Search Console because it also alerts you if they find any errors such as 404 pages, security issues, index issues, etc. Basically, anything that can affect your search engine rankings.
Like any tools out there, just adding your website to Google Search Console is not enough. There are many features that you can use. But don’t worry, I will try to cover everything I know to help you effectively grow your website traffic like an expert.
Step #1. Adding Your Website(s) To Google Search Console
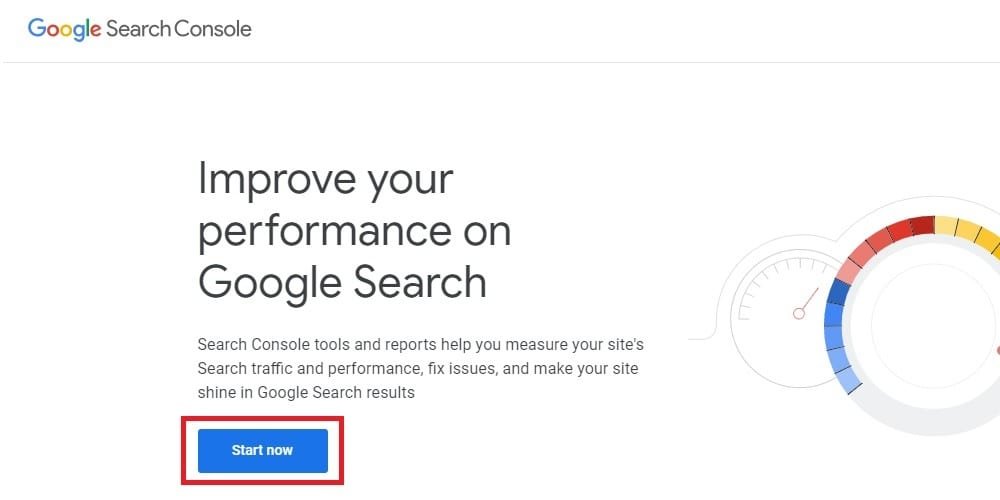
Before anything happens, you’ll have to add your website to Google Search Console. Simply go to the Google Search Console website and click on the Start Now Button.
If you have a Google or Gmail account, you can use it to sign in. Once you’ve signed in, you will be asked to enter your website URL. (Make sure you type the correct address because Google considers HTTP and HTTPS as two different protocols).
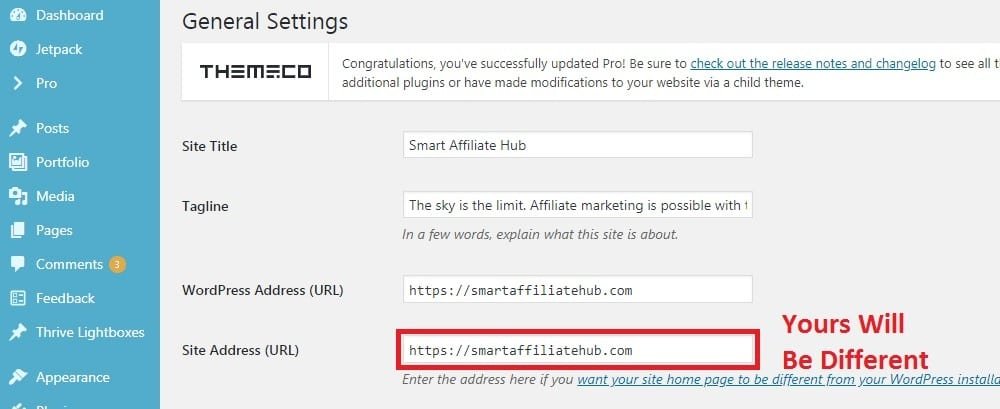
If you are unsure of your website URL, simply log in to your WordPress Admin Panel and locate Settings > Generals.

After entering your website URL, click on the Add Property Button. Next, you will be asked to verify ownership o your website. Google Search Console offers you multiple ways to do so. Personally, I recommend HTML tag because it’s the easiest method.
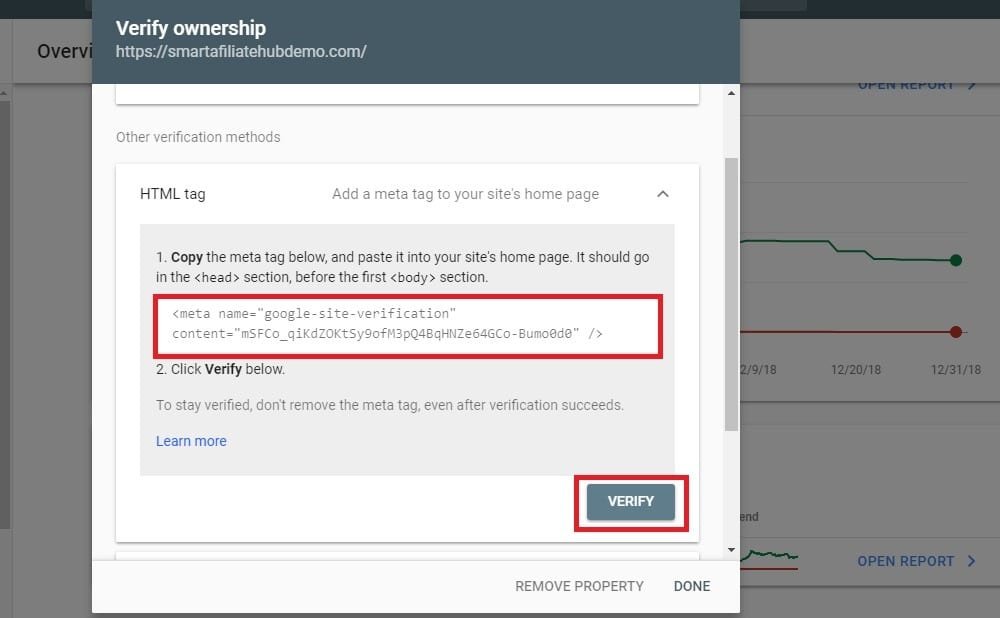
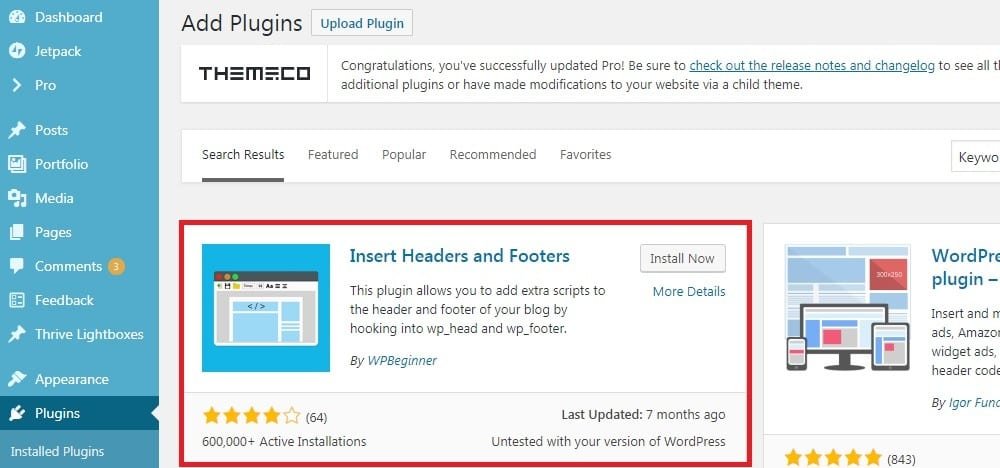
Simply copy the HTML Code and place it on your WordPress website. A simple way to do so is by installing and activating the Insert Headers and Footers plugin on WordPress.
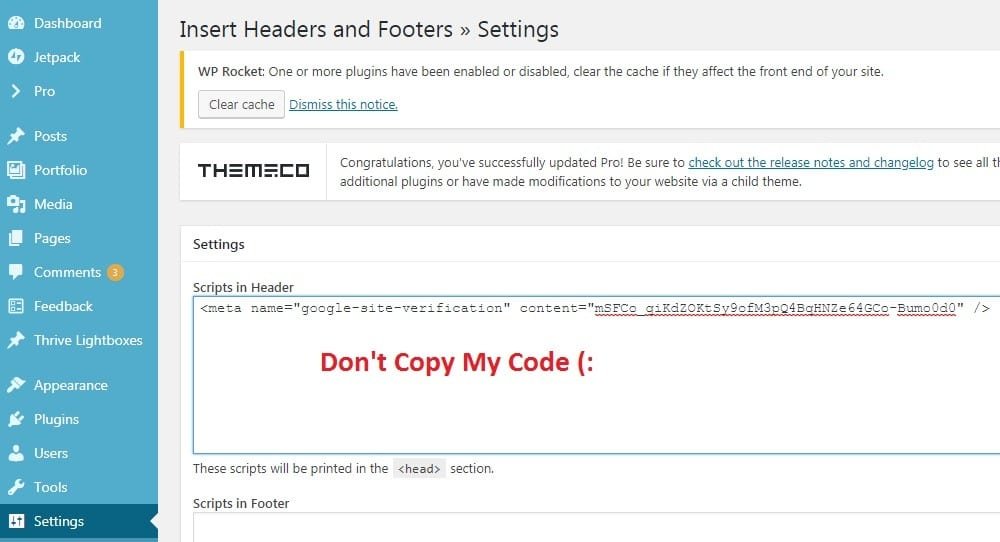
After activating the plugin, simply go to Settings > Insert Headers and Footers > Paste the HTML code you copied earlier inside the Scripts in Headers box. Make sure you press save after you’re done.
Once you’re done, just go back to Google Search Console and click on the Verify button.

Once the HTML tag is placed properly on your website. It will show you a message indicating that the ownership has been verified.
And that’s it! Congratulations on successfully adding your website to Google Search Console. You can now search for your property whenever you visit your Google Search Console dashboard.
Step #2. Set Up Your Preferred Domain Name
Since Google considers URLs with www. and without www. as two different pages. You’ll want to set up a preferred domain. Otherwise, Google will consider the links going to www. and without www. as different URLs.
First, you’ll want to switch to the older version of the Google Search Console. Simply locate “Go to the old version” on the left column.

Next, locate the gear icon on the top right-hand corner and select site settings.

Once you get to the next screen or site settings, you will be presented with 3 options for your preferred domain. The first option is to not set a preferred domain name (not recommended).
The last 2 options will allow you to set your preferred domain with or without the www prefix. Simply choose the one that you used earlier (found on WordPress Admin Panel > Settings > Generals). Again, make sure you click on the save button.
Step #3. Set Up Your Target Country
Depending on who your website caters to geographically speaking. You will have to tell Google that. Again, by being on the old version of Google Search Console. Locate Search Traffic > International Targeting.
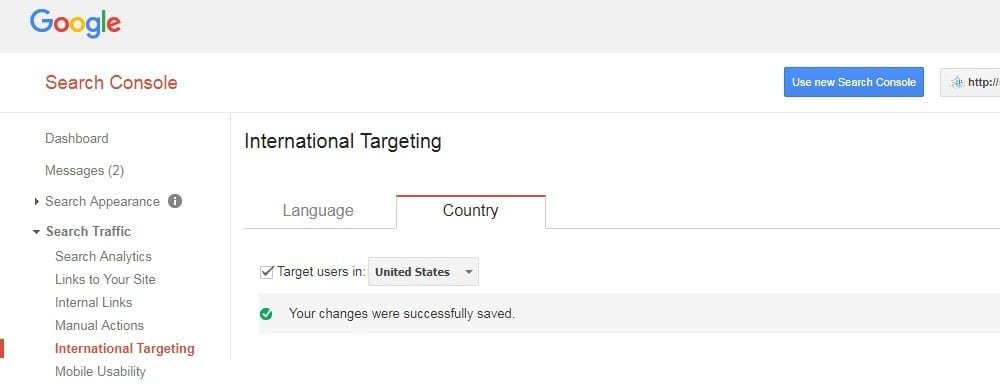
By targeting the appropriate countries. It will help Google understand your target audience and give you a better chance at your search results. For example, if you’re targeting the United States, it will help tell Google that you want your content to be shown to people in the United States.
Step #4. Adding Your XML Sitemap
A sitemap is literally what it is… a map to your website. It tells search engines all about the pages and posts that exist on your website. It maps out the places for search engines to crawl using their bots. And by adding a sitemap, you are basically telling search engines to index your content as quickly as possible.
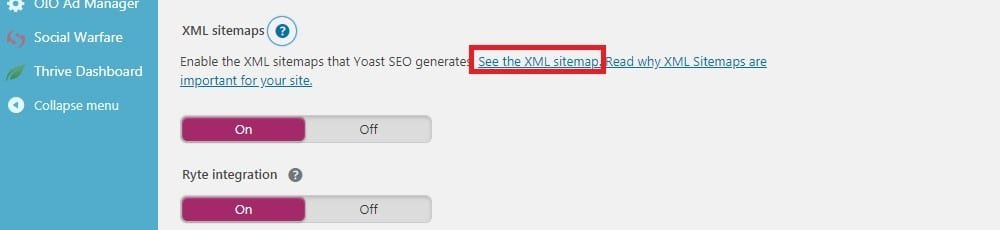
Personally, I use the Yoast SEO plugin. After installing and activating Yoast SEO, the plugin will automatically generate the XML sitemap or your website.
Simply click on SEO > Features > and locate XML Sitemap and you’ll find this:
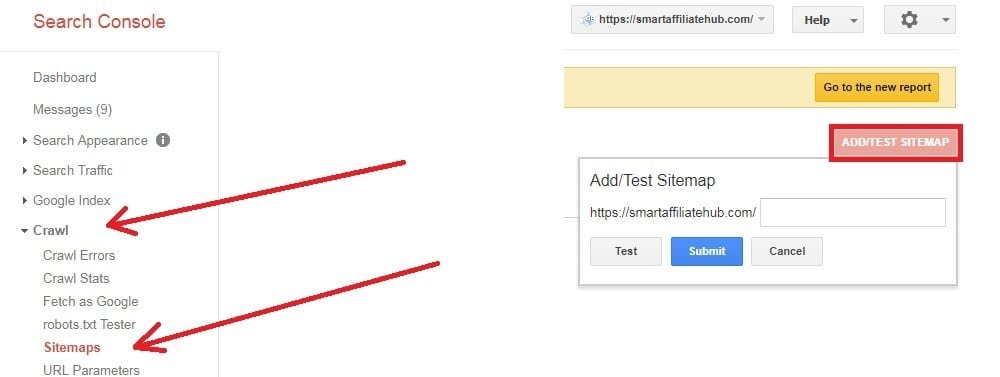
Once you’re done, make sure you click the submit button to save the changes.
Step #5. Pair Google Analytics To Your Google Search Console
Google Analytics is another must-have tool provided by Google. It helps track your website for visitors, where they are coming from, geographic locations, etc.
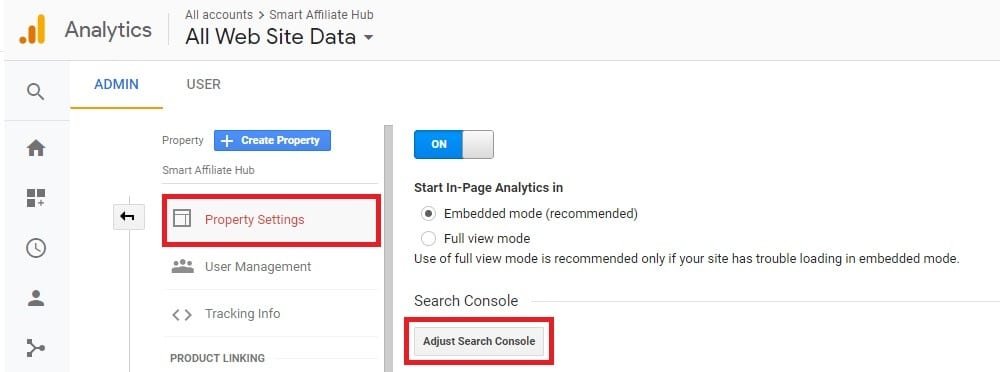
If you haven’t installed Google Analytics yet, you should check out my guide on how to do so by clicking here. Once you’re done, log in to your Google Analytics account and click on admin which is located in the left column.
Locate your property > property settings > adjust search console (click it).
Next, simply click on the Add button and select your website.
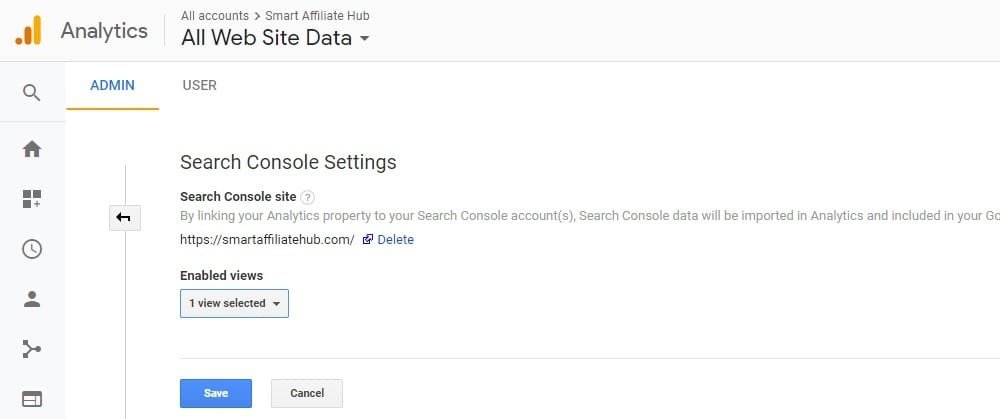
Once you’ve successfully paired your Google Analytics with Google Search Console. You can now get your Google Search Console reports in your Google Analytics account via Acquisition reports.
There you will find 4 options:
- Landing Page – Number of times a page appeared in the search engine results page, click through rate, and average position.
- Countries – Similar to the stats you see from landing pages except you will see the countries of where you are getting traffic from.
- Devices – To help you maximize conversion, you can see how your website is performing on desktop, mobile, or tablets.
- Queries – This displays the keyword data that you are getting clicks and impressions for.
Step #6. Find And Fix Search Engine Index Issues
The best cure to the deadliest disease is prevention. The same applies to your website. You can view Google Search Console as on-site medical personnel constantly monitoring the health of your website.
As your website grows, errors are inevitable. In fact, these errors can affect your search rankings by not allowing the search engine from crawling and indexing pages and posts on your website.
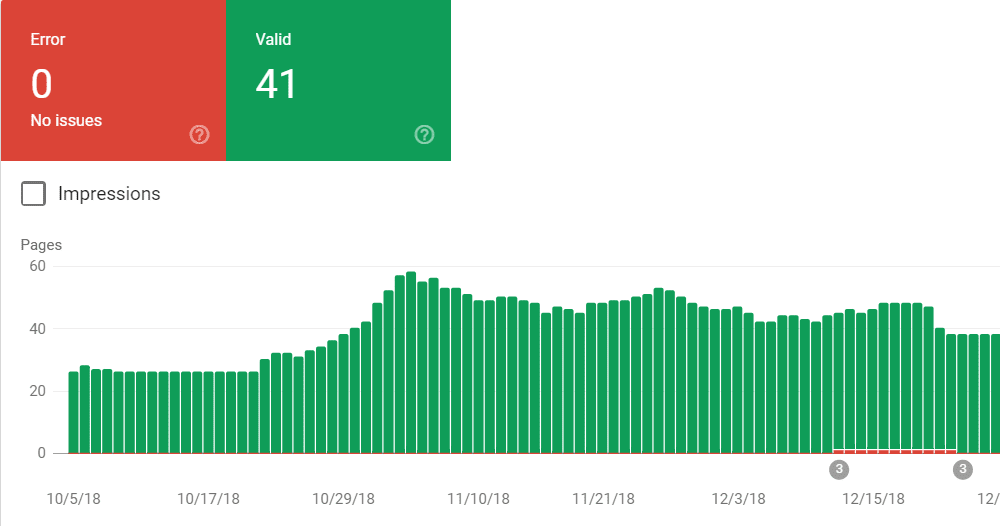
To locate these errors, simply go on to your Google Search Console dashboard and locate coverage. It will show you which pages from your website are indexed by Google and which ones are giving an error.
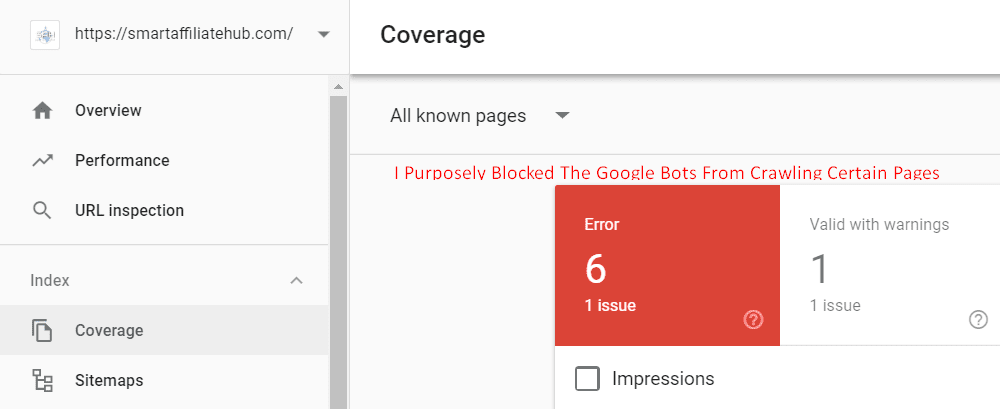
To give you a better understanding of potential errors. Here are a few common index errors you may see:
- 404 Error – This means that the Google bot (crawler) checked out a URL of yours, but was given the 404 error.
- Soft 404 Error – This happens when the crawler sees a 404 error, but the page’s status code is sending a success (200 response) message to their browser.
- Not Followed – This happens when the crawler is not able to view the content. (Javascript, iFrame, etc)
- Server Error – This happens when your website server timed out. This is not very common, but can occur if your website is under heavy traffic, maintenance, or down for whatever reason during the time of crawling.
Since errors are inevitable, let’s take a look at how to fix these errors.
How To Fix 404 Errors In Google Search Console
Depending on the link to the 404 pages, you might want to leave it alone. For example, if you’ve recently deleted a blog post that was indexed on Google. It will show up as an error, but it will go away eventually.
However, if you’ve changed the URL, you’ll want to redirect your users to the updated URL. The nice thing about Google Search Console is that it gives you the ability to see the errors. Otherwise, you’ll probably never deal with it. Out of sight, out of mind, they say.
By clicking on the errors found in the index coverage report, it will show you all the pages that are displaying the error. Check each of them individually and if you see a 404 error page. You’ll have to make the judgment call of fixing it or leaving it alone.
If you use Yoast and opt-in for the premium version, you’ll have access to their built-in redirects tool.
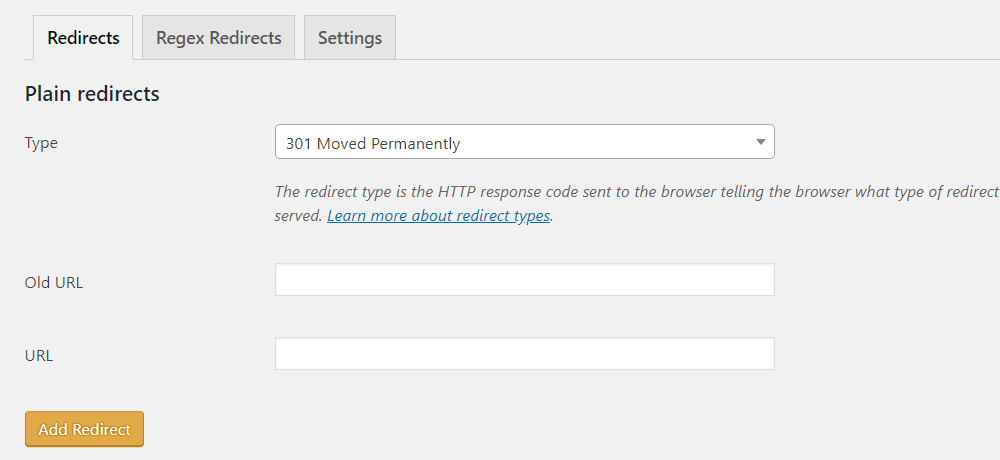
How To Fix Soft 404 Errors In Google Search Console
When a page on your website returns a soft 404 error, it won’t appear in the search engines. Over time, Google will de-index pages that return a soft 404 error. This is definitely not good for SEO. Search engines don’t like indexing a page that no longer exists.
I don’t have any soft 404 errors to show you but like the regular 404 errors. You’ll want to double check each link to see if the page is displaying correctly. If it is displaying correctly, simply ignore the error.
However, if the page is showing a 404 error, you’ll have to do the following:
- If you changed the URL, do a 301 redirect (permanent) to update it to the new URL
- Disable the WordPress Search URL from getting crawled by Google.
To disable the WordPress Search URL, simply locate your robot.txt file. If you use Yoast SEO, simply click SEO > Tools > File Editor. By default, your robot.txt will show something like this:
Default Version
User-agent: *
Disallow: /wp-admin/
Allow: /wp-admin/admin-ajax.php
Updated Version
User-agent: *
Disallow: /wp-admin/
Disallow: /?s=
Disallow: /search/
Allow: /wp-admin/admin-ajax.php
As you can see, I added Disallow: /?s= and Disallow: /search/ to the robot.txt file. Once you’re done, go back to your Google Search Console Dashboard and click crawl > robots.text tester > submit your robot.txt file again. Give it a few days and check your coverage again to see if that fixed the errors.
Check Your Website For Security Issues
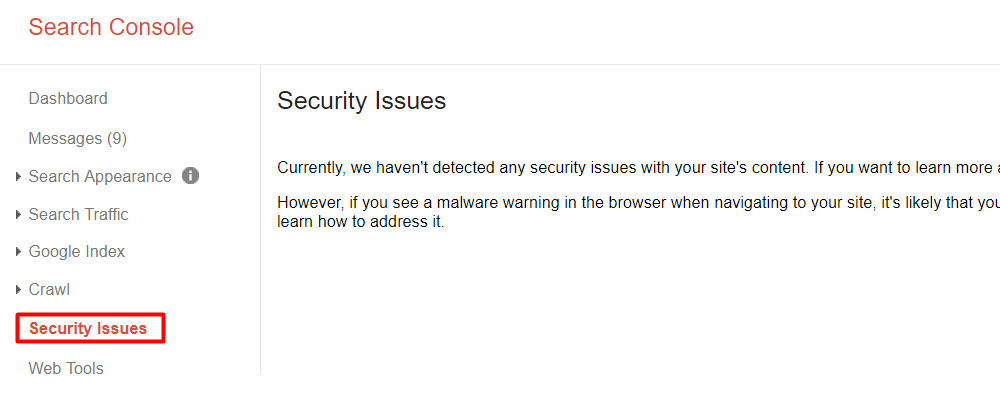
Fortunately, I don’t have any security issues because it can stop Google bots from crawling your website. When a page is affected, Google may remove the affected pages to warn users. As a result, your page’s ranking may drop.
Like your computer, the most common issues that affect a website is malware and trojans. That’s why I recommend having a backup plan for your website. Or you can try reaching out to your website hosting provider to seek for help. Usually, they will be more than happy to help you out to retain a customer.
Check For Manual Actions
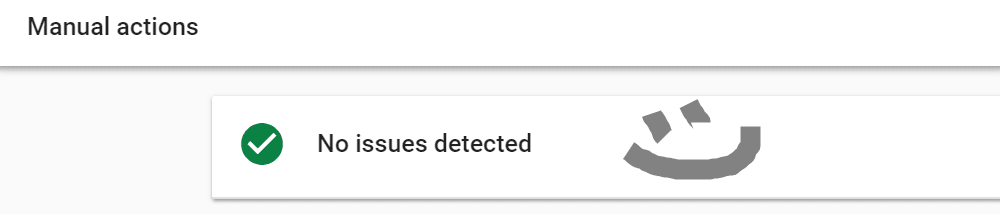
Manual actions are imposed by an actual person; a staff from the Google Search team. This should not be ignored and treated with care immediately. Seeing as a manual action taken against your website can affect your website(s) search traffic.
This can happen if your website is involved in fraudulent acts, spam, illegal activities, etc. Google Search Console will provide you with the details about why a manual action was taken against your website and how to fix it.
Once you’ve fixed the issue, click on the request review button, so the Google Search team can look into it and hopefully remove the penalty against your website.
How To Use Google Search Console To Grow Your Traffic
This tip was actually from Neil Patel and it’s super effective! Congratulations, if you’ve got the technical part of Google Search Console out of the way. Next, let’s get on with the fun stuff!
Note: This is based on what I remember from watching a video from Neil!
Step #1. Check Keywords You Are Currently Receiving Traffic For
Keywords are search terms users type in search engines. For example, how fast does a cheetah run? that’s a search term if I type that into Google, Yahoo, or Bing.
That’s why internet marketers are constantly optimizing their content to target keywords that they want to rank for. By doing so, it improves their chances of making it on top in the search engine results page.
Unlike years ago where you had to guess for keywords. There are tools that you can use now such as Jaaxy Keyword Research Tool and Neil Patel’s Uber Suggest Keyword Tool. – These are both great tools to optimize your content with appropriate keywords.
Moving on, Google Search Console also provides you with data on keywords you are currently ranking for, total clicks, impressions, average click-through-rate, and average position. (Click on Performance Tab)

On this page, you will find keywords that you are currently ranking for, how many impressions, current position, and click-through-rate. You can sort this data by using the filter option.
You can also click on the following tabs (Queries, Pages, Countries, Devices, and Search Appearance) to display respective information. Once you understand which keywords are driving traffic to your website. It’s time to find long-tail keywords that you can easily rank for.
Step #2. Finding Long Tail Keywords
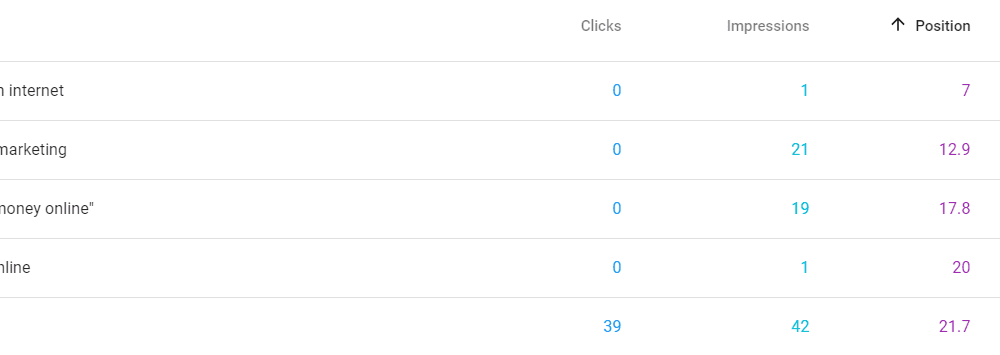
As you can see, some of the keywords above are ranked on pages that most people won’t get ever to. This can happen depending on how competitive your niche is.
First, find keywords that are getting the most impression and click-through-rates. Next, use a keyword research tool like Jaaxy or UberSuggest to find long-tail keywords that are also receiving lots of impressions.
Step #3. Beef Up Your Content
The reason why your page or blog post is not ranking for a keyword is probably because Google finds another page or blog post more useful to its users. With the low tail keywords that you’ve found. It’s time to beef up your content by reviewing those blog posts and adding the keywords that you’ve found in a way that it provides even more value.
Don’t just stuff them in your blog post because it will destroy the flow of your article which decreases user experience and increases bounce rate.
Check Your Links In Google Search Console
Links play a strong signal when it comes to SEO. After all, people don’t link back to a website unless they find the information valuable. Google and other search engines see it the same way.
The links report in Google Search Console displays your website’s performance in terms of external and internal links. More importantly, you can see which website is linking back to you and how often they link to your website.
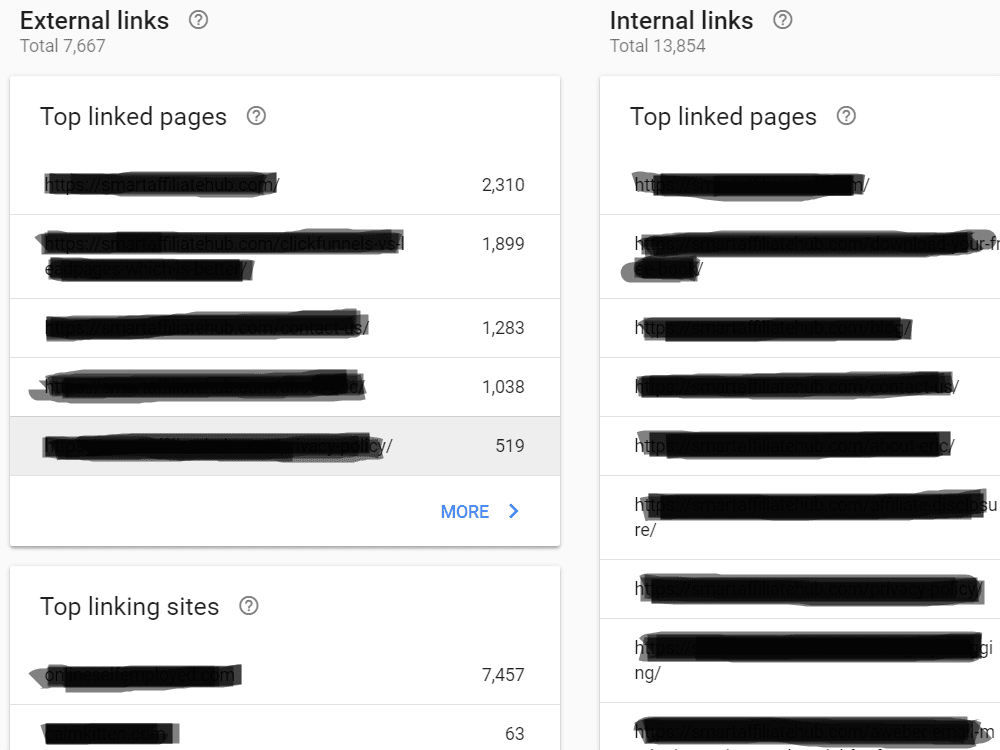
Gain more external links for free: Simply go to the external linking websites and see if they have other content that can be linked back to your website. If they’ve linked to your website already, then it shouldn’t be a problem getting them to link to other pages or posts from your website.
Make a list of URL’s that they can link back to your blog. Next, reach out to them individually (contact form) and thank them for linking to your page or post and briefly mention that you have a link that they can include to another one of their article.
Now the chances of them linking back to other articles is not 100%, but asking is better than not asking at all. Definitely try to build a relationship with them by leaving comments, retweeting their Social Media posts, etc.
Internally link your own pages and posts: Now asking other people to link back to your website can be a pain in the you know what. It’s far easier to link back to your own pages and posts within your website.
Google and other search engine uses internal linking as a metric to determine how important a post or page is. If you’re constantly linking back to a particular page or post. They will eventually figure out that it’s an important piece of content that should rank better on search engines.
Just make sure you only add internal links wherever it makes sense. Otherwise, your users will find it annoying and destroy their user experience. You want to move forward, not going backwards.
Fetch As Google
Fetch as Google is a tool that allows you to fetch any page from your website and see it as a Google bot. Using the older version of Google Search Console, simply click crawl > fetch as google.
For the newer version, you’ll have to go to index > coverage > click on an URL and you’ll see the option to fetch as Google.
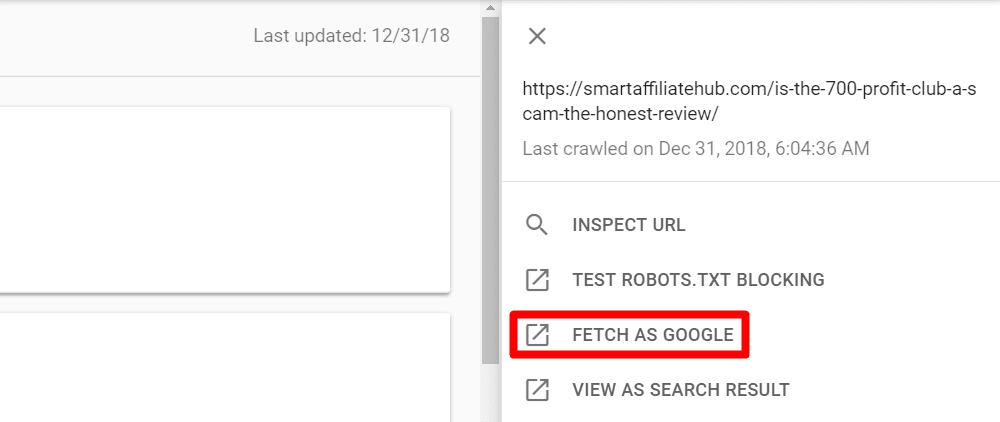
After fetching your URL, you will see if there’s an error or if it was crawled successfully. If the page is crawled successfully, you’ll be able to open it up and view its details.
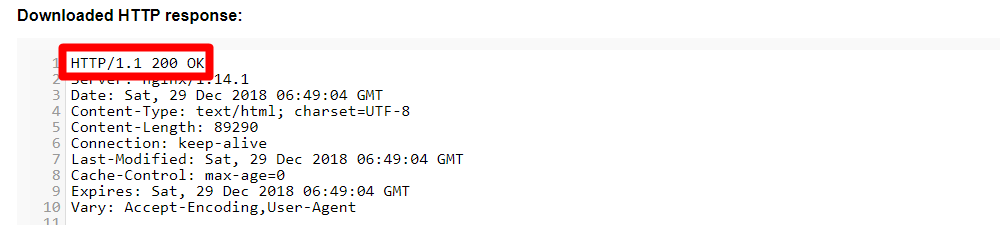
If it shows 200 OK, then that means the Google bot was able to view the page.
Lastly, double check the double time which is located at the bottom of the HTTP response. Speed means a lot because nobody has time to wait for your website to load. I would test this a few times during the day because it can vary depending on your websites traffic.
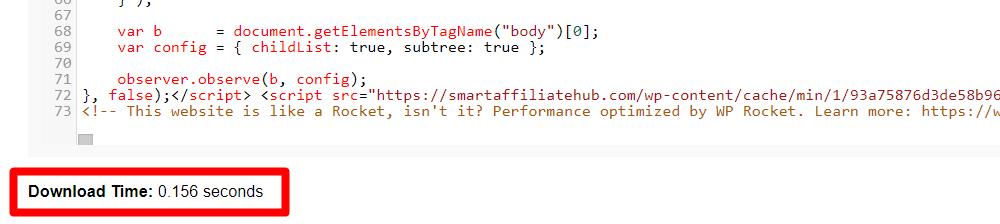
Here’s a tutorial on how to improve your website’s speed using w3 total cache plugin.
Request Google To Index Your Pages and Posts

Going back to fetch as google, you can actually request Google to index your website faster. This is extremely helpful if you need to get an article out there as quickly as possible. Recently, I posted a Black Friday sales post for Hostgator and it’s time sensitive, so I can’t wait for Google to find it.
So instead, I requested Google to index it by using the fetch as Google feature. Simply enter the URL you’re trying to get indexed and click fetch. Once Google has fully downloaded the page, you can then request indexing.
Make Sure Your Website Is Mobile-Friendly
Most searches are now done from mobile devices. That’s why websites that are mobile-friendly are favored in terms of SEO. Google Search Console has a mobile usability report that shows you how well your website is performing on mobile devices.
I recommend checking out your mobile usability whenever you make any changes on your website. This is not very common because most WordPress themes are designed to be mobile-friendly. But it doesn’t hurt to double check!
Give Permission To Your Team
If your website is operated by a group of marketers. It may not be a bad idea to give your team access to Google Search Console. By providing them with access, they can now work on different areas of your website based on the information provided by Google Search Console.
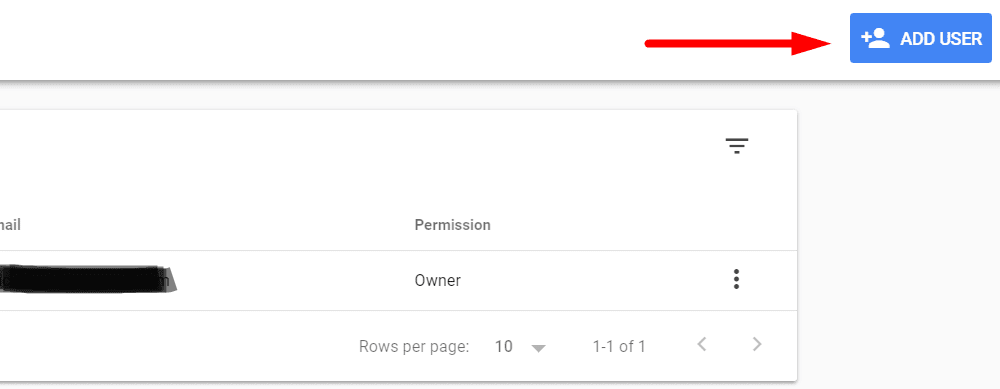
Google Search Console allows you to add users and give them access without giving out your Google account credentials which protects you in case someone decides to go rogue.
To add a user, simply locate settings > users and permissions > add user.
In order for your team members to have access, they must have a valid Google email address. You can either create them yourselves or have your team members create it instead.
There are two types of permission you can give to your users:
- Full Permission: Unrestricted access to everything including the ability to add new users.
- Restricted Permission: Basically everything except the ability to add new users. < Recommended
Once a user is added, he or she will receive an email notifying them of their access. Afterwards, they will be able to log in and view the data for your website.
Remove URLs From Google Search Result
Lastly, if you want to remove an URL from Google search results, you can do so by requesting for it via Google Search Console. However, if you use Yoast SEO, you can request for a specific page or post to not be indexed before you publish it.
To remove URLs from Google Search Results, switch to the older version of Google Search Console and click Google Index > remove URLs.
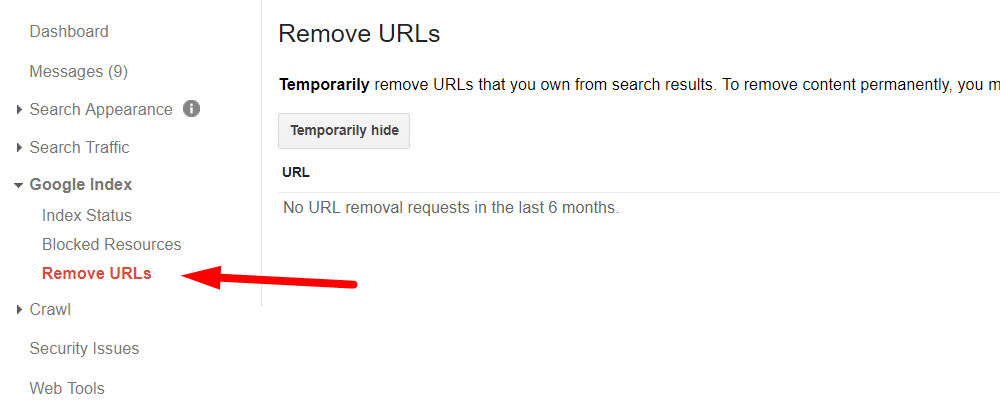
Note: It will only temporarily hide your URLs for 90 days. If you want to permanently remove it from Google search results, you’ll have to delete it from your website.
I Hope This Helped!
We’ve finally come to an end with this article. Hopefully this was helpful and provided you with enough tips to use Google Search Console to effectively grow your website traffic.
When I first started using Google Search Console, I didn’t think too much of it. Over time, I realized how great of a tool it really is. But again it’s nothing if you don’t use it properly.
If you have any additional questions, please leave a comment down below and I will try my best to help you out! Also, if you enjoyed reading this article (probably not), please do share this with your peers.
Kind Regards,


